Why Choose Solar Power for Your RV
- Quiet alternative to generators Some parks do not allow the use of generators, or restrict the hours of use due to the noise. And wouldn’t you rather listen to birds chirping and other sounds of nature rather than the sound of a generator running?
- Renewable, safe power source
- Cost-effective Once installed, it only takes sunlight to run it.
- Low maintenance No moving parts means virtually no repairs – and the only maintenance is cleaning off dirt & debris from the solar panels. A solar system on your RV may last for decades if well cared for.
- Extends your battery life If you have lead-acid batteries, using solar to recharge them on a regular basis prevents them from repetitive discharge and lengthens their lifespan.
Terms to Know
Solar Panels – Made up of individual solar cells that convert sunlight into energy – specifically DC voltage. Individual panels can be joined together to create a solar array. Note that there are flexible panels or rigid panels. Rigid panels must be bolted into place on the RV roof. Flexible panels can be used if your RV roof is rounded, and these can be secured using an adhesive. My research has uncovered many negative comments about flexible panels, however. Since they do not allow air to flow underneath them, their lifespan is reduced due to the heat generated.
House Batteries – These are the batteries that supply 12 VDC to your RV to run the RV systems such as lights, water pump, furnace blower, vent fans and slide outs.
Charge Controller – controls the amount of voltage and current that is being supplied to your batteries from your solar panels.
Inverter – converts DC power from batteries to 120VAC to use for major appliances and AC outlets.
Shore Power – this is a term used for the AC power that you can plug into when staying at a campground.
How it Works
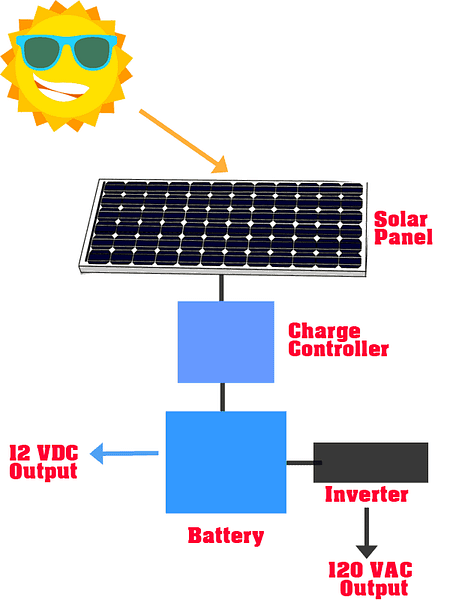
Solar panels collect sunlight and convert it to DC voltage. The panels are connected to a charge controller which regulates the voltage and current being fed into the battery. DC output from the battery runs your 12VDC RV electrical system. DC voltage from your battery can be fed into an inverter, which converts DC voltage to AC voltage, which can be used to power your outlets and major appliances.
What components do I need?
Portable Solar Kits
If you only need 100-200 watts of solar power, then you can use a portable kit. If using a portable kit, everything you need should be included with the kit. Kits can be connected directly to your battery using cables. Or, if you have a “solar ready” side port on your RV, choose a portable kit that is compatible with your solar port.
Rooftop Solar
For a rooftop installation, which is necessary if you require more power than a portable kit can provide, you will need the following components:
Batteries – unless you already have sufficient battery power, consider updating your house batteries. Most RVs have a 12V battery or battery bank (multiple batteries connected to achieve a 12V output). Typically they are lead-acid batteries. This battery type can only be drawn down to 50% capacity before needing to be recharged. These cost much less than lithium batteries, but also are less efficient and do not last as long.
Lithium batteries are the most expensive but best option for off-the-grid living, as they can be drawn down 80-100% of their capacity without causing harm to the batteries.
See more about sizing batteries from AM Solar.
Solar panels – Collects sunlight and converts it to DC voltage to recharge your batteries. Note that solar is only used to charge your batteries, not to run your RV electrical system directly.
Charge controller – Regulates the amount of voltage and current coming from the solar panels and being fed to the batteries.
Inverter – converts DC voltage from your solar panels into AC voltage to use with major appliances and outlets.
Battery monitor – Monitors power consumption and battery status. You may already have one in your RV. If not, it is recommended for use with a solar setup.
What can be powered by RV solar?
With just solar panels and no inverter to supply 120VAC to power major appliances, you will only be able to power things that run on the 12VDC provided by your house batteries. Those things include lights, vent fans, water pump, TV (12VDC TV that came with your RV), slide outs, refrigerator control board, and furnace blower. The amount of power you can use before depleting your batteries will depend on what size system you install.
When adding an inverter, which converts the DC voltage to AC voltage, to your system, you can power major appliances such as your microwave and refrigerator (when not using propane) and also use the AC power outlets. Note that you will not be able to run your RV air conditioner using solar power, unless you’re going to make a major investment and install a very large solar array. Average systems for RVs will not handle that size power draw.
What size system do I need?
As with anything else, this depends on factors like how often you will be camping off-the-grid or boondocking, and how much and how often you use power in your RV for lights and appliances. Do you want to be able to stay for free for an overnight or two without hookups and otherwise will be at campgrounds that have electrical hookups? Or will you be boondocking on a regular basis and be off-the-grid for 1-2 weeks at a time?
The best article I’ve seen regarding determining what size system you need for your RV is at RV with Tito. He suggests first determining how much you run down your batteries in a day with your normal power usage. Fully charge your battery bank, then go out for a day without hookups and see how much power you have left in your battery bank after your first day’s use. Then you know how much battery power you will need to get through a typical day. His article suggests sizing batteries to handle 24-48 hours without recharging. Also note that flooded or AGM lead batteries can only be run down to 50% power before having to recharge them. Therefore, you will need to size these batteries to handle twice as much as your entire day’s usage of power, so you do not run them down below 50% of capacity. Lithium batteries, which are quite a bit more expensive, can be run down 80-100% before being recharged without causing any harm to the batteries.
What is the cost?
Costs vary greatly depending on factors like how much power you use during a typical day, what type of appliances you have and how much power they require. There are portable solar kits for as low as $400, and complicated high-end systems that can cost almost $20,000 (I heard this cost stated on someone’s YouTube video)! With much research, this is what I’ve been able to determine are average costs:
Weekend campers who opt for a solar kit to get started can get kits as low as $400. This is a 100-200 watt system that will only recharge your batteries, so it will not give you the ability to use any AC power outlets, appliances such as your microwave, and definitely not air conditioning. These are recommended for campers who only need to run off batteries for a short period of time, and don’t need to use much power. This will suffice for running a few lights and some small electronics.
Full time RVers that have moderate power usage while boondocking = Average costs of $1,500 – $3,000 for a 200-300 watt system. This includes the solar panels, batteries, controller and inverter necessary to convert the DC voltage to AC so you can use AC power outlets. This size system supports basic use of small electronics like laptops and TVs, plus your RV lights, etc., for a longer period of time.
Full time RVers that have moderate power usage while boondocking = Average costs of $4,000 – $6,000 for a 400-600 watt system, with $3,000 – $4,000 of that being components and $1,500 – $2,000 for installation. Information I have gathered from those who shared their experiences online stated an average cost of around $3,000 – $4,000 or a little more, but those were without most of the installation costs as they were do-it-yourselfers. This includes the solar panels, batteries, controller and inverter necessary to convert the DC voltage to AC so you can use power outlets and run appliances like your microwave, and higher wattage items like a hair dryer. There is a great article here by “Gone with the Wynns” about their experience installing solar power. They started with a 400 watt system and then added on a portable 200 watt system.
Full time RVers that want to be able to run loads of gadgets at the same time and possibly run the air conditioning all day will need a higher end system, about 800-1,000 watts of power. I have seen costs of $12,000 – $20,000 for this type of system. This video here by Hebard’s Travels shows their almost $20,000 setup.
How difficult is it to install solar on an RV?
There are plenty of do-it-yourselfers out there who have shared their experiences about solar installation. It can be done! If you have some experience with and understanding of electrical systems along with some mechanical aptitude, there are tons of step-by-step tutorials available. It’s definitely not a one-day project, however. Preparation is key. Make sure you have the installation planned out ahead of time. Plan out how / where the panels will be situated on the roof; where the control box and other electronics such as the inverter (if using) will be located. Ensure you have the proper size wiring, all of the required connectors, shrink tubing, cable clamps, sealant, mounting brackets and hardware, fuses and circuit breakers if they didn’t come with your kit.
Things to consider:
Solar panel mounts (tilting? Flat?). Flat mounts are “fixed”, meaning that you cannot move or tilt the panels once installed. The panels will not be able to be tilted towards the sunlight to maximize the performance. This can also cause problems if you want to make modifications to your system later on and cannot access the wiring on the back of the panels without removing the mounts. Tilt mounts allow you to move the panels up to capture maximum sunlight, and to have access to wiring if necessary. AM Solar has created a solution for all mounting requirements – see their “Rocker Foot” option on their website – https://amsolar.com/rv-solar-panel-kit/mounting-accessories , and this video showing the installation – https://www.youtube.com/watch?time_continue=11&v=bdkI-ZRMA3Q&feature=emb_logo.
Ventilation – airflow underneath the solar panels can increase their efficiency and lifespan. This is an advantage of using rigid panels because air can pass underneath the panel mounts. Flexible panels are glued directly to the RV roof, and therefore do not allow airflow underneath, which may decrease their efficiency. Some installers will only use rigid panels, as they consider the flexible panels to be flimsy and cheaply made.
Wiring size – This is very important, because if you do not use the correct gauge of wiring for your system, the voltage drop between the controller and battery will be too large and your system will not work properly. It is also essential to limit the length of the wire.
Putting a hole in the roof in order to run the wiring from the solar panels to the controller. It is sometimes possible to route the wiring through an existing vent, but it is not always recommended. Some folks are uncomfortable with this, and may want to leave this to the experts.
The best information I’ve seen for do-it-yourselfers is at the AM Solar website. They also have information for sizing the controls and wire properly. There is also a great step-by-step of a 600 watt system installation on Camp Addict: https://campaddict.com/rv-solar-system-installation/
If you do not want to tackle the installation yourself, expect to pay $1,000+ for someone to do it for you. The following companies can help with installation. I have not worked with these, this list was compiled using Google Search and Google Reviews.
AM Solar https://www.amsolar.com
Boundless Power Systems https://www.boundless-ps.com/
Cliff’s Welding https://cliffswelding.com/rv-solar-panel-installation.htm
Discount Solar http://discountsolar.company/
Off the Grid Camper https://www.offthegridcamper.com/
Precision RV https://precisionrv.com
Quality RV Solar https://www.qualityrvsolar.com/
RV Solar Solutions https://www.rvsolarsolutions.com/
About RVs that are “Solar Ready”
Some newer RVs come with a port for connecting a solar kit. I wasn’t sure what this meant, and it wasn’t easy getting answers from the dealership, so I did some research. Apparently, this means different things to different RV manufacturers, so it depends upon the brand. Some are truly ready for a solar kit to be added, and some just include a coil of wire (really!). Be sure to get specifics on what is included, plus what size wire and what labor has been done. Basically, it just means that it has been pre-wired and includes a plug that will work with portable solar kits.
Solar Ready Side Ports
These are set up to handle portable solar kits, but only up to about 200 watts. This will work for campers that don’t use much power, and generally use shore power. Zamp ports are used most often, and are compatible with Zamp solar kits. Go Power ports can be used with Go Power solar kits and also Zamp solar kits. Furrion side ports can be adapted to use Zamp solar kits, but be aware that they will only work with up to 140 watts, unless the provided 10 amp fuse is replaced.
Solar Ready Roof Ports
Several RV manufacturers offer roof ports, which will handle around 400 watts of solar. All of the wiring has been done already, which will save you a ton of time (and money if not installing yourself).
The bottom line is that “solar ready” does not mean that any of the system components are included – you will still need either a portable kit to use with a side port, or all of the components to go with the roof installation, including the panels, controller, and inverter if you are going to use one.